"You are so creative!" I have heard that phrase constantly since I was little. DIY, Refashioning, Crafting, Sewing, Woodworking. I love it all! Now I have a place to keep my favorite projects or ideas organized and share them with you!


Monday, April 30, 2012

Adventure is out there!


When my daughter lost her second tooth, I knew I had seen that face somewhere before.


 These photos were taken just after her tooth came out and were in no way staged to look like Ellie. We didn't make the connection for a couple more days when she smiled and talked.


"Adventure is out there!"

Wednesday, April 18, 2012

Chicken and Dumplings Made by my Dumplings!


It was a cold and rainy day. The kids could not go outside to play. So I put them to work making dinner.
My daughter who is a picky eater, has been talking about a friend who got chicken and dumpling soup from Cracker Barrel. She went their with a friends family for dinner and thought it looked good.
So this week when I saw someone pin a chicken and dumpling recipe and label it as "Cracker Barrel Chicken and Dumplings" I thought I better have her make it. I couldn't say whether this is like their soup or not, since I have never actually eaten at a Cracker Barrel restaurant. But it was an easy enough recipe to try out anyway.
Here is a link to the original recipe and directions, They never mention Cracker Barrel though.
Pretty simple:


  • 2 cups Flour

  • ½ teaspoons Baking Powder

  • 1 pinch Salt

  • 2 Tablespoons Butter

  • 1 cup Milk, A Bit Less Than A Full Cup


  • Mix dry ingredients first, then cut in the butter so it mixes into a crumble texture, then mix in the milk.


    They mixed the dough, and rolled it out flat. 


    Big sister couldn't believe that little brother actually got his rolled thinner than she was able to.


    He took rolling very seriously and did a great job, he kept rolling and didn't give up until it was just right. He did it with NO help. Like I said, big sister was amazed! Mostly because she asked for help after a short time rolling.


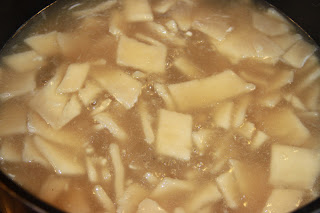
    Then I gave the kids a pizza cutter to cut the dough into small rectangle dumplings.


    Some enjoyed the cutting a little too much. But some bigger and some smaller dumplings worked just fine.


    They boiled up nice in a pot of chicken broth and drippings from a chicken I cooked in the crock pot the night before for dinner. It was a great way to use the chicken leftovers as well.


    It was a hit with the kids, project wise, and dinner wise. It doesn't take long at all either. The original recipe says 30 minutes, but we added some time for dough play.

    Tuesday, April 17, 2012

    Concrete Block Herb Garden

    I did it!
    I built my herb garden today!
    I used six concrete blocks I got from Craigslist.
    I stacked them up into a shape I liked, filled them with dirt and that's it.

    I decorated it with sidewalk chalk today, which I realize will wash away in the rain, but I am sure my little artists will keep it well decorated all summer long.

    I would have used some concrete glue to stick them together but I am not worried about them falling, and this way I can either add more to it next year or easily move it to another spot if this spot doesn't get enough light, or gets too hot from the rocks around it.


    I even had a tiny set of volunteer chives pop up in my garden from two years ago, I was able to easily transplant them over to their new home. They are hearty little things so I know they will do well anywhere I put them.


    I had an extra strawberry plant that needed a home too so I stuck it into one of the spots and gave him his own little greenhouse since it is a bit early for strawberries outdoors. He had nowhere else to go and honestly I was excited to stick something in my new planter.


    Oh and if you were wondering who that little rock guy is there at the bottom?
    His name is Herb.
    Hehehe.

    I am new to herb gardening so we will see how this year goes planting them in cement blocks.

    Monday, April 16, 2012

    Finding Fossils!

    Did you know that you can find fossils just by searing in your landscape river rock?
    Well evidently you can, cause we did!

    We found this interesting fossil.


    We brought it to my son's preschool teacher who is very interested in Geology and she brought it to her club. Her group leader identified it as a  fossil stingray tooth. They used these teeth to crush clam shells.

    I looked up some images of stingray teeth and did not found one like it So I joined an online fossil forum and posted photos to ask if anyone could help with identifying it.

    Check this link out!
    Pretty cool huh?
    It is a rare fossil of a shark's tooth. A shark who lived during the late cretatious period and has been extinct for over 85 million years!! It uses these wierd teeth to crush the hard shelled animals that made up it's diet.
    CRAZY!
    I found out later that river rock is a good place to find fun things like this. Who knew we could hunt for fossils right in our own backyard?


    Here is the link to our post so you can see what he and others had to say about our fossil find.
    http://www.thefossilforum.com/index.php/topic/29101-seeking-second-opinion-stingray-tooth/

    Sunday, April 15, 2012

    Juice Carton Wallet


    "Mom I want a wallet!!!"
    This is what my daughter has been saying for the past week and a half.
    I really don't think she needs a wallet and I really didn't want to go buy one either.
    But I did always want to try to make one out of a juice carton.


    Enter an empty orange juice carton I saved from Easter brunch.

    "You want a wallet? Let's make one!"

    "Huh?"


    We followed the video tutorial from Family Fun and printed out their template.
    She needed help for this project, it was not super simple and did take some work.


    I would say the most difficult part was making sure you score the fold lines on the side really well. If you do not they want to fold in places that don't work.


    Cutting the tiny circle hole to put over the spout is a bit tricky too.


     I do however love how the orange ended up in a cool spot on the back and the word NICE is above the spout. This orange juice was purchased at Walgreen's.


    A super happy camper with her new wallet. Cost to me $0.


    NICE!

    Saturday, April 14, 2012

    Building a Nature Fort!


    Doomsday Preppers here we come!
    Ok maybe not... but honestly after watching that show I did pack our 72hour kits just to be ready. Although there really isn't much in the middle of the Midwest we will have to leave our house for. Except maybe in the aftermath of a tornado, and if a tornado hits our house, pretty sure the packs will be gone, and chances are it is not going to hit every house so there will be plenty of people ready to help out. But... We are ready just in case. :)

    Yet not every idea on the show Doomsday Preppers is totally out of this world.
    You can get some good ideas of fun things to do with your kids by watching. I am not talking about dressing up in full bio-hazard gear, and
    of course you don't want to scare them and tell them that you need to learn how to build a survival shelter so that if you find yourself lost in the wilderness you won't die.

    But ...
    To build a fort using only sticks and leaves!!!!!
    WAY COOL FUN THING TO DO!!!!

    There are actually a few great books for kids that cover how to do this. Here are two we just checked out from the library.

    A Kids' Guide to Building Forts   by Tom Birdseye is a fun book written for kids to give them ideas of how to build forts using things they find. It is a book for maybe the 10-12 age, and there are some things that parents might want to supervise. But I found some great ideas I had never thought of in this book. Lots of illustrated pictures to show how things are done as well. Although I am not sure what the author was thinking putting all the letters in all the words in capitals. He much have come from another time when that didn't mean yelling but I kind of felt yelled at while reading it.  This book kid contain the style of fort we built.

    Let's Go Outside by Jennifer Ward also has a short chapter on  fort building ideas as well. It did not have the exact fort we built, but her book has  tons of fun outdoor games, and activities such as gardening, that bring you and your child closer together while spending time outdoors, (away from the lure of electronics), I am planning on writing a few ideas down from this book for our next camping trip to keep the kids busy, and also making a bucket list from this book for some fun summer break adventures.

    But onto our fort:
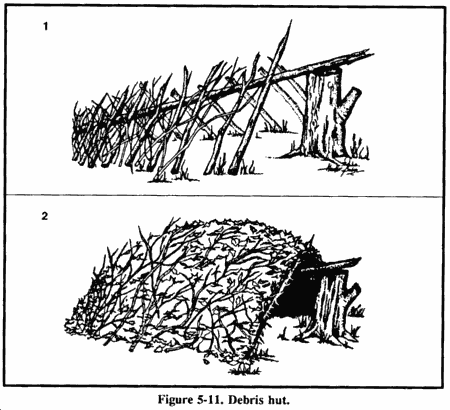
    At the time we went on this adventure, (the Monday after Easter when there was no school) we didn't have either of these books yet. We simply looked up online how to build a survival shelter. There are tons of places online that show how it is done.
    We just looked at a simple illustration found in an image search and tried it out.


    Here is our set up, in a local park, slightly off the path, but still visible from one of the Frisbee golf holes. There was plenty of dead branches and materials to use, as well as leaves. It has been dry around here lately and too cold yet for bugs so it was perfect. Around 63 degrees. It was a great temp for working without getting too hot.

    The kids wore hooded sweatshirts long pants, socks, shoes, and thin gloves.
    I recommend the gloves, the kept their hands from getting too dirty, or from getting scratched by sticks and leaves. The gloves turned out to be a really good idea. I brought some work gloves for myself as well.

    The kids picked out the main branch, and we found a great spot to prop it up. Then we started layering our sticks. Next time I know  to check to see if there is enough space first before layering the sticks. My kids fit great but I was a bit too long for our shelter by only a few inches.


    Then when our sticks were layered we started putting on TONS of leaves.


    Then we took a snack break. The project took around 2 hours start to finish, so a break was needed, but no one was bored, they were having a blast! A real wilderness adventure.

     Here they are eating the Teddy Grahams and Animal Crackers they got for Easter.
    Thanks Grandma!


    Here we are about halfway done. We still needed a few more longer sticks. They were a bit harder to find than the shorter ones. My son also found a giant log that was loosing it's bark and we were able to put large pieces of bark in some of the openings to keep the leaves from falling in.

    Finished!
    Keep leaves on the ground inside too so you have a comfy place to lay on and to insulate you from the cold ground.

     Cosy enough for two.

     Plenty of room to sleep one!

    The finished outside just looks like a large pile of leaves.

    It was so much fun building! Here is our camp. Complete with a backpack tree!
    Now that kids know how to do this I am sure they will be off building forts on our next camping trip with their cousins.
    Tuesday, April 3, 2012

    Water Color 2 by 4 Frames


    I was going to wait until the big "kids bathroom redo" reveal to post this project but it turned out too cool not to share now.
    I was inspired by a couple pins I saw on Pinterest.


    The first was this one with the kid's photos above each of the towel hooks.
    We already use hooks in the bathroom so I thought this a clever idea to fill the space above them.
    Easy enough... but you know me.. I can't just buy frames I have to do something more fun.

    I also saw these frames on Pinterest someone is selling them on ETSY. Someone else pinned them and said they would make them using scrap wood and frames from Walmart.  I like the original design better. Why? Because I had everything I needed in my house to make them. No need to buy Walmart frames.

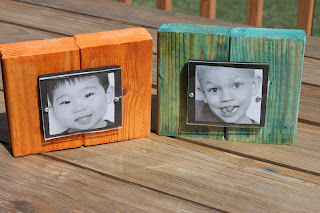
    I used scrap 2 by 4's, some scrap pallet wood, scrap plexiglass, and small screws.
    As well as some clamps, and a box cutter, a drill, saw, wood glue, etc.


    I liked the bright color of her frames. But I didn't want to go and buy some fancy wood stain so I brainstormed how I could paint the wood yet still see the wood grain.

    Enter water colors!
    GENIOUS!!!


    I had the kids help paint their own blocks of wood with water colors.  It was the perfect thing to use to get the look I wanted.
    Please note: We color code our children. Their cups, coats and towels are always the same color for each child. Green Blue and Orange respectfully thus the color choices. It makes life easier. That way everyone knows who's stuff is who's.
    After they painted them, I put a few coats of clear poly spray paint to seal in the color from any bathroom moisture.


    I then painted some scrap from a wood pallet black to add some more dimension to the frame and used some plexiglass scraps we had in the basement and some screws to finish off the frames.


    Yep! I totally manned up and cut my own plexiglass after reading a few tutorials I found on Pinterest of course. I was pretty proud of myself. I really wanted to ask my husband to do it for me, but then I knew I would be waiting for a while. It really wasn't that difficult to do myself once I tried.


    The photos I took today and printed them off on regular printer paper in grey scale.
    They didn't cost anything and I can easily change them out whenever I want to.

    So my total cost for this project  came to $0. I didn't buy a thing, it was all just stuff we had laying around. It sounds like my house is full of junk doesn't it?

    This means if you are a friend of mine and you want to do one of these projects you might want to call me to see what junk I have laying around first before you go buy supplies.


    Another cool thing about using 2 by 4's is that the frames can also stand up on their own.
     

    Or you can hang them up.


    Now the kids know where to hang their towels.


    Linking up here: